>> BUILDING A RASPBERRY PI 3 CLUSTER (PART 3)
TRIVIA: Did you know a cluster of Raspberry Pi's is known as a "Bramble"?

We are almost nearing the completion of our Raspberry Pi
cluster, or as we should call "bramble"
- all that we must do is configure the slave nodes so they are isolated
from the real world and are reachable exclusively by the master node. As
soon as we finish building and configuring all of the nodes - what will we
do with it? It definitely isn't powerful enough to consider mining bitcoins.
STEP 1: CONFIGURING NETWORK
In a similar manner in which we defined the IP address of the master node;
we need to assign a fixed address for each of the slave nodes. We need to
modify the DHCP client settings, in this case we will define the gateway
to be the master node for routing of traffic.
$ sudo vi /etc/dhcpcd.conf
interface eth0
static ip_address=3.141.59.x/24
static routers=3.141.59.1
static domain_name_servers=8.8.8.8
Since we are not going to use the WiFi network interface; we can disable it
on boot:
$ sudo vi /etc/rc.local
# disable wlan0 on the slave nodes
ifconfig wlan0 down
While we are at it; we might as well create some alias's for the nodes:
$ sudo vi /etc/hosts
3.141.59.1     rPi01
3.141.59.2     rPi02
3.141.59.3     rPi03
3.141.59.4     rPi04
Make sure there are not duplicates in this file for hosts - you will
need to remove the 127.0.0.1 entry for the current host. This
is all that is required to provide connectivity to the master node.
STEP 2: MOUNTING SHARED DRIVER WITH NFS
In order to access the shared disk partition on the master node; we need
to install the NFS client software. In a similar manner that we did with
the USB drive, we also need to define a mount point for access - we
will use /mnt/nfs, similar to the alias we defined on the master node.
$ sudo apt-get install nfs-common
$ sudo mkdir /mnt/nfs
$ sudo chown -R pi:pi /mnt/nfs
There are a couple of methods to mount the drive; but it comes with caveats.
The solution I put together took into account that the cluster would be a
single powered unit; so I utilized the /etc/rc.local script to
mount the NFS partition.
$ sudo vi /etc/rc.local
# mount nfs drive - make sure master has time to restart nfs-server
sleep 15s
mount -t nfs4 rpi01:/mnt/usb /mnt/nfs
Since our master needs to restart the nfs-server due to some
race condition - we have to veer away from using techniques such as
fstab to mount the drive. The solution I devised was to use a fifteen
second delay before trying to mount the partition.
STEP 3: MISCELLANEOUS SETTINGS
We created a set of ssh keys on the master node to allow
logging into the slave devices without a password; all we need to do
now is to copy the public part of the keys to the slave nodes.
$ mkdir ~/.ssh
$ cd ~/.ssh
$ scp pi@rPi01:.ssh/id_rsa.pub authorized_keys
$ chmod 600 authorized_keys
We should now be able to ssh to the slave from the master without
having to use a password.
STEP 4: VERIFY SETTINGS
We can do a few sanity checks to make sure everything has been done right:
$ ifconfig
eth0 Link encap:Ethernet  HWaddr b8:27:eb:94:36:22
     inet addr:3.141.59.2 Bcast:3.141.59.255  Mask:255.255.255.0

$ ping www.ardiri.com
PING ardiri.com (68.169.35.245) 56(84) bytes of data.
64 bytes from ardiri.com (68.169.35.245): icmp_seq=1 ttl=51 time=183 ms

$ df
Filesystem     1K-blocks    Used Available Use% Mounted on
/dev/root        7541056 1111744   6093224  16% /
devtmpfs          493892       0    493892   0% /dev
tmpfs             498224       0    498224   0% /dev/shm
tmpfs             498224    6620    491604   2% /run
tmpfs               5120       4      5116   1% /run/lock
tmpfs             498224       0    498224   0% /sys/fs/cgroup
/dev/mmcblk0p1     64456   21328     43128  34% /boot
rpi01:/mnt/usb 123207680   60928 116865152   1% /mnt/nfs
At this point; we have a functional cluster of Raspberry Pi 3 devices;
while the unit in itself boasts sixteen ARM CPU 1.2Ghz cores, totalling
a whopping 19.2Ghz - it really now comes down to writing applications
that can utilize all the CPU cores of the unit in parallel.
The good news is that a
standard
exists called Message Passing Interface (MPI) for writing parallel applications
- there are a number of implementations available. It is effectively a
protocol for sending and receiving messages between different processes
that could run on the same device, or across multiple devices.
So; what does a fully put together unit look like?
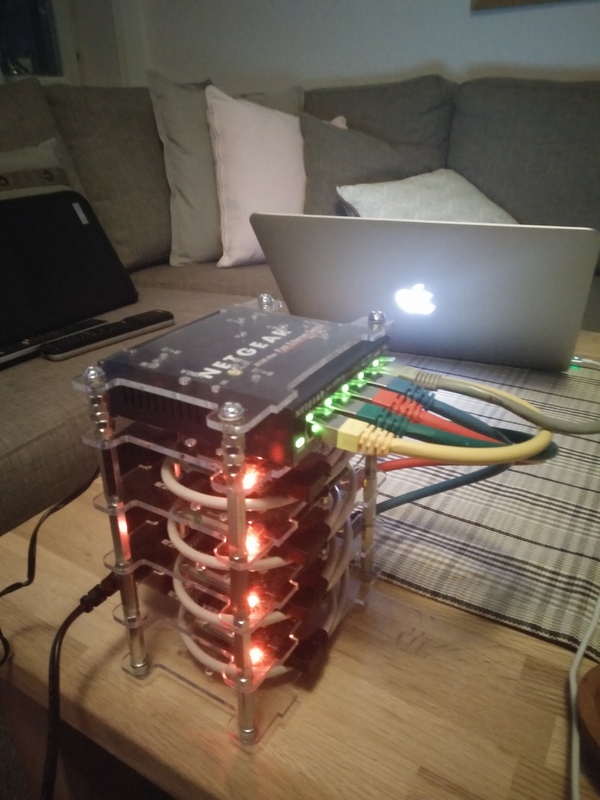
The irony of the project is that the housing and cables cost as much as the
Raspberry Pi devices. But damn; the finished product definitely makes it a
candidate for some great looking nerd porn, nice and compact - complete with
flashing LED lights as network traffic passed through.
![[Valid RSS]](valid-rss-rogers.png "Validate my RSS feed")