>> ARM MBED - "HANDS ON" AND FIRST IMPRESSIONS
In IoT something new comes along every day and you just need to get your hands dirty.

ARM
has been busy the last few weeks with various announcements so it was time
to pull out the various
mbed.org
enabled devices I had access to (Nordic Semiconductor
nRF51 DK,
RedBearLab
nRF51822 and
BLE Nano)
and take the development environment for a spin and reflect on first
impressions and feasibility as a future IoT platform.
So; what exactly is mbed OS?
mbed OS is a modern full-stack operating system that is designed specifically
for ARM Cortex®-M-based MCUs; ... optimised for energy efficiency,
connectivity, security and reusable software components, it will become
the foundation that enables widespread innovation in the IoT space.
source: mbed.org website
ARM hasn't just launched this initiative; they have been working hard to
establish partnerships with various micro-controller hardware providers
that utilize the
Cortex-M
based processors to launch with multiple development boards available -
with over fifteen different vendors already shipping hardware at the time
of writing this post.
Step 1: Acquiring mbed enabled hardware
In order to deploy an mbed application; it is important to have access
to a micro-controller that is capable of deploying the binary files
that are created - such as the following devices:
- Nordic Semiconductor nRF51 DK
- RedBearLab nRF51822
- RedBearLab BLE Nano
It's easy to see when a board is supported as an "mbed enabled" logo
will be visible on it.
Step 2: Creating a developer.mbed.org account
ARM has created an excellent developer community website that hosts not
only information on the platform itself; but they also wrap the various
tools required to develop for mbed into the website - meaning there is
no need to download compilers to get started.
http://developer.mbed.org
Registration is free and it does not take long to create an account to
get started - great for those who find other development environments
frustrating when it takes hours to download, install and get all the
tools and environment set up correctly.
Step 3: Add your platforms to your compilation environment
Once logged in; you will be able to see a Dashboard and
Compiler buttons in the top right hand corner of the browser;
go into the compiler mode and then you need to add the platforms you
will target.

It definitely isn't obvious how to do this - however if you try to create
a new program - it will tell you you need to add a platform in order to
get started. Alternatively you can also click on the "no device selected"
button in the top right hand corner (maybe UI needs to be improved?)
Step 4: Create your first mbed program
The online IDE allows you to create a new program; depending on the board
you have selected - it will offer you the examples that the micro-controller
manufacturer has uploaded and made available for mbed developers.
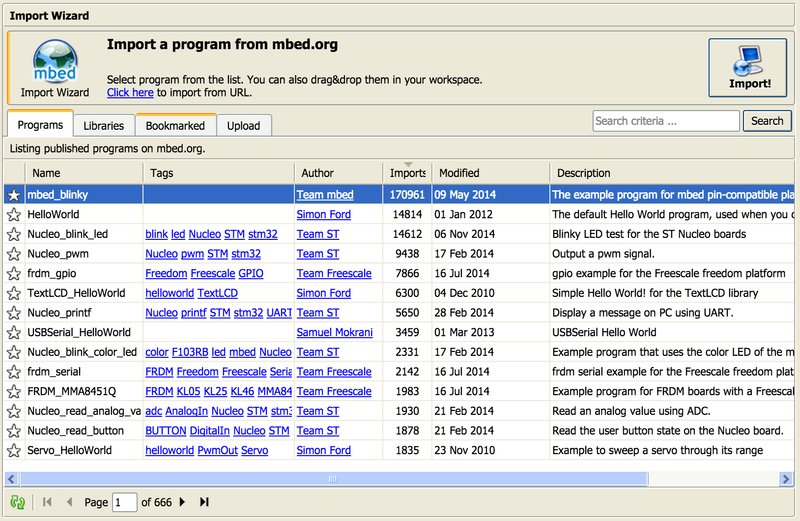
Instead of creating a new project from a template; start from important
an existing application that has been uploaded by the mbed development team -
specifically "mbed_blinky".
It should then provide you a very simple mbed application that looks like:
#include "mbed.h"

DigitalOut myled(LED1);

int main()
{
  while(1)
  {
    myled = 1;
    wait(0.2);
    myled = 0;
    wait(0.2);
  }
}
This application is a "Hello World" application utilizing the LED on the
development board and goes into an infinite loop by setting the digital
out PIN associated to the LED to HIGH (on) and LOW (off) every 200 ms
blinking the LED repeatedly showing you the application is running.
Unfortunately; "LED1" may not be correctly defined for the environment
so it is important to check the reference pin out to know exactly which PIN
is used for the LED. For the nRF51-DK, there are four LED's which are
named P0.21, P0.22, P0.23 and P0.24
respectively.
A simple change is required to the source code:
-DigitalOut myled(LED1);
+DigitalOut myled(P0.21); // LED1 (refer to pin-out)
Once this is done; you simply select the target platform - in this case it
will be the platform named "Nordic nRF51-DK" and then press the
"Compile" button within the web based IDE. If everything goes ok;
it should offer you the following file for download:
mbed_blinky_NRF51_DK_.hex (244080 bytes)
You have now successfully compiled your first mbed application and are
ready to deploy!
Step 5: Deploying your application
If you are used to other IoT development environments; this may seem a little
different for you initially - but once you get use to it and ensure you have
the right drivers installed it will be as easy as simply copying the file to
a pre-determined location.
When you insert the mbed enabled device into the USB port - it will mount
the device as an external storage medium; calling it "MBED" or "JLINK"
depending on the board you are using. For the Nordic Semiconductor board
it was a dependency to download the
Segger J-Link
drivers in order to deploy the binary correctly - for other devices this may
not be required.
Deploying the application simply involves copying the hex file
to the external storage medium. Once the copying is complete; the device
will restart and launch your application - and then the drive will re-mount
waiting for the next application to be written to it.
It is nice to see ARM making a serious effort to make mbed development
available to a lot of developers without the need to download and configure
compilers - using an online IDE environment also means that they can ensure
the tools are up-to-date and as devices are added they can be easily accessed
by developers.
There is a lot more to investigate in the developer.mbed.org website
and how to specifically take advantage of specific features in various
micro-controllers. I will continue to look into the platform over the
next few days and I may report on my experiences here.
If you are not a fan of the web based IDE - the good news is that ARM is
planning to release command-line tools and further improvements with
mbed v3.0.
Currently the offering is quite limited to whatever the micro-controller
manufacturers have uploaded - to see a more comprehensive stack of services
will be a blessing; it just isn't there yet.
![[Valid RSS]](valid-rss-rogers.png "Validate my RSS feed")